Alternator Conversion
As many of us add various electrical accessories to our classics, the need for more reliable charging becomes increasingly important. Whilst the old dynamo & control box set up was perfectly adequate in the days when even a heater was a optional extra, nowadays halogen headlamps and other electrical goodies make the old set-up borderline at best. Converting your Herald (or any other Triumph) to run on an Alternator is pretty straightforward, but is a question that gets asked on forums etc. on a regular basis, so here's one more article on the subject.
Choosing & Fitting the Alternator
The most common Alternator choice is the Lucas ACR type as this was standard fitment on many British cars of the era. They aren't a straight swap with the dynamo, so you will need to either make your own spacers and brackets, but I would recommend buying one of the conversion kits (Pic 1) which are available from most of the Triumph suppliers for around the £45.00 mark for just the brackets, obviously more if it includes the Alternator as well.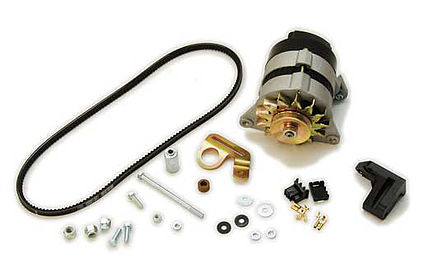
Other Alternators can be fitted, many of the suppliers sell high output models or ones that look like a dynamo, but both types are considerably more expensive than the ubiquitous Lucas item. You pays your money and takes your choice.
Wiring
Before you make any changes be sure of the following two things:
- That you car is Negative Earth, if it isn't you'll need to address this first, you can't fit an Alternator to a positive earth vehicle.
- You know the output of the Alternator you're fitting, anything greater than 25amp and you'll need to add an extra wire back to the battery if you have a standard wiring harness.
Your control box is now redundant, either remove it completely and replace with some kind of junction/fuse box or remove the innards and solder suitable cables to make the required connections (Pic 2). Whichever route you take, you'll need to connect the wires as follow:
- The thin black earth cable is not needed and can be disregarded.
- The thin Brown/Green & thin Brown/Yellow cable should be joined together, this is the connection between the small field terminal on the Alternator and the dash warning light.
- This should leave you with 5 thicker cables, 2 x Brown/Blue (Lights), 1 x Brown/Yellow (Alternator) & 2 x Brown (Solenoid & Horn), these need joining together.
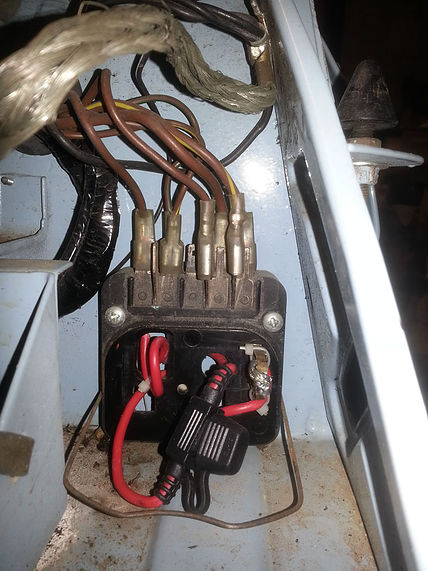
For Alternators with an output over 25amp, use the second large terminal on the back of the unit to run a suitable cable to the live side of the starter solenoid, this will carry the extra load back to the battery.
If you are applying this information to anything other than a 13/60 Herald, the wiring colours maybe different, but the basics are the same:
Disregard the earth cable.
Join the two thin wires (field/warning light)
Join all remaining thicker cables (feed, lights etc.)
Other information
If you want to save the cost and make your own mounting brackets, do ensure you get the Alternator pulley in line with the crank & water pump pulleys, if not you may experience premature failure of the bearings in the Alternator or Water Pump or both!